»»»»
Cupboard Your search result

Android phone guides

This tag is associated with 3 posts

Easy Guides How To Repair Invalid IMEI On Any Android Devices


imei

How To Repair Invalid IMEI On Any Android Devices

IMEI is short for International Mobile Equipment Identity and is a unique number given to every single mobile phone, typically found behind the battery. IMEI numbers of cellular phones connected to a GSM network are stored in a database (EIR – Equipment Identity Register) containing all valid mobile phone equipment. so if any device if it does not have the IMEI it will not connect to the network, marked by the absence of a signal icon or baseband unknown on the settings, and this usually occurs because installing new firmware or after performing a hard reset, fortunately for those who always make a backup before flashing or hard reset can easily restore it, for example by doing a backup via MobileuncleTool.apk, TWRP 3.0 recovery that supports EFS Backup or via ADB command.

And on this occasion, I would like to write how to restore the missing IMEI, for those who forget to backup IMEI.

What you need to do before starting  :

  1. Turn off the phone and look for the words IMEI numbers for your device “is usually located behind the battery”, and note the IMEI numbers.
  2. Rooting your devices. —> Read here

No PC, Follow instruction belows

  • Download and install Chamelephon.apk on your devices. —>Download Here
  • Make sure that your phone has been successfully rooted.
  • Open Chamelephon.apk
  • Write or enter IMEI numbers that you noted earlier, and select Apply now IMEI. Mobileuncle MTK Tools- screenshot thumbnail  Mobileuncle MTK Tools- screenshot thumbnail
  • After Chamelephon managed to write, reboot your phone.
  • Now, Check your IMEI number by call *#06#

Using PC, follow image guides belows

700px USBdebug Settting And2

im 1

im 4

im 5

imei c1

Furthermore, let’s discuss in the comments field below. Thanks, enjoy it 🙂


How To Update Android 6.0.1 Marshmallow Samsung Galaxy Note 5 (Sprint) Using Odin3 Methods


https://i0.wp.com/cdn.redmondpie.com/wp-content/uploads/2015/12/android-6.0.1-marshmallow-main.png

Android 6.0.1 Marshmallow Samsung Galaxy Note 5 (Sprint)

Features/Enhancements:

  • Android 6.0.1 Marshmallow update
  • Google and Samsung Security updates
  • Bug Fixes

Important Info:

  • Phased roll-out of the update starts on 3/24/16 and will be completed by 4/8/16
  • Keep in mind devices receive the update in phases each day. Customer Care cannot tell users when they will exactly get the update.  Please do not call asking.  Thanks
  • For additional information, check out the software update article in Official Support.

How to Update Android 6.0 Marshmallow Samsung Galaxy Note 5 Using Odin3 Methods.


Preparation stage :

Download files needed :

 Step updates :
  1. Download all required files to your computer.
  2. Install Samsung USB Driver
  3. Extracts Odin3_v3.10.7.zip and Run Odin3_v3.10.7.exe
  4. Extracts ALL_SPT_N920PVPU2BPC3_N920PSPT2BPC3_CL7231607_QB8832851_REV00_user_low_ship.tar.zip , and you will find ALL_SPTN920PVPU2BPC3_N920PSPT2BPC3_CL7231607_QB8832851_REV00_user_low_ship.tar.md5
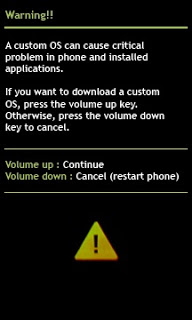
  5. Now turn off your Samsung Galaxy Note 5, after completely turn off press and hold Volume Down + Home + Power button until you can see Warning Signodin press
  6. at Download Mode, press Volume Up then connect your device to computer.https://boycracked.wordpress.com/wp-content/uploads/2016/02/4eb84-3.jpg?w=750
  7. Connect the USB cableUSB Cable connected
  8. If Samsung USB Driver already install right on your computer then Odin3 will recognize your device as another COM Port. Now press the PDA button, select on ALL_SPTN920PVPU2BPC3_N920PSPT2BPC3_CL7231607_QB8832851_REV00_user_low_ship.tar.md5 and then press Start button below, process usually take 20-30 seconds to finish and will be mark with GREEN PASS message on the odinHow to Root Right Samsung Galaxy A5 SM-A500F Running Lollipop 5.0.2
  9. Done, you have successfully upgrade your Samsung Galaxy Note 5, now you can disconnect your device.

If you wanna root the phone

Well, Before starting to following this guide i must warm you that rooting device have some risk, losing data because accident delete, warranty void, tripping KNOX and the most biggest risk is brick your Samsung Galaxy Note 5. So please very consider before starting to following this guide.

  1. Download CF-Auto-Root-noblelte-nobleltejv-smn920c.zip  by
  2. re-turn off your device, go into recovery mode ( PRESS Operates simultaneously Volume Up + Home + Power )
  3. on TWRP recovery, select Install zip, and then install CF-Auto-Root-noblelte-nobleltejv-smn920c.zip  ( NO WIPE )
  4. Reboot now, Enjoy 🙂

To confirm that your already successfully rooted install root checker from Google Play Store.

Congratulations, You already success Root and received Android 6.0 Marshmallow on Samsung Galaxy Note 5 using Odin method, please leave comments if you found problems or any broken links. Thank You 🙂

Credits to : Sunderwear

Regards,

BoyCracked


How To Installing TWRP & Root ZTE v5 PRO a.k.a ZTE Blade X9, ZTE Blade A711


https://i0.wp.com/www.techzoom.it/wp-content/uploads/2016/02/TWRP-Recovery-001-620x400.jpg

Obtaining root rights have become mandatory for Android users before be advanced. Even some developers have made a special application to root android devices easily like Kingroot, Framaroot, etc. and here I will try to give a little tutorial on how to install TWRP custom recovery and gain root rights with safe at ZTE v5 PRO also known as ZTE Blade X9, ZTE Blade A711 in some country.

Preparation :

  • PC/Laptop
  • USB cable
  • ADB driver —> Download Here
  • ADB-Fastboot Tool.zip —> Download Here
  • Download SuperSU.zip and save to Phone storage —> Download Here
  • TWRP 3.0.0.0 Recovery For ZTE v5 PRO N939St / N939Sc ( ZTE A711/ X9) —> Download Here
  • at your phone, go to settings–>About phone –> Tap 10x your Build Number for activated Depelover Option.
  •  in Developer options : switch on OEM unlocking and USB Debugging


How to installation TWRP (Custom Recovery) to ZTE v5 PRO ( ZTE A711/ X9)

  1. Install ADB driver.exe
  2. Extract ADB-Fastboot Tool.zip
  3. Copy recovery.img to ADB-Fastboot Tool folder
  4. Turn off your phone
  5. Press simultaneously “Volume down and Power button”, you in Fastboot mode now
  6. Connect USB Cable to PC

60c84-connect-android-device-computer

7. in ADB-Fastboot Tool folder, you will find OpenCMD.exe, double click OpenCMD.exe

8. Type the following command….

fastboot oem unlock —> ENTER

fastboot flash recovery recovery.img —> ENTER

fastboot reboot —> ENTER

TWRP has been installed on your  android devices

twrp zte v5 pro 2

How to Rooting ZTE v5 PRO ( ZTE A711/ X9)

  1. Turn off your device and go into recovery mode “Press simultaneously “Volume up and Power button”
  2.  Install SuperSU.zip
  3. Reboot and Enjoy 🙂


Credits to : nFound, saptahari

Source : Github

Follow BOYCRACKED on WordPress.com

Translate

Flag Counter