
On this occasion we will learn how to install TWRP custom recovery on the Oppo R9 Smartphone also known as Oppo F1 Plus, before stepping into the tutorial section, please note the specifications of the mobile phone below to avoid unsuitable partitions that will be fatal, so please Do it carefully and risk it on your own.
-
Device name
|
OPPO R9 / Oppo F1 Plus
|
| Model number |
X9009 |
| Android OS |
5.1 Lollipop |
| Color OS |
V3.0.0i |
| Network |
2G/3G/4G LTE |
| Screen |
5.5 inches AMOLED capacitive touchscreen |
| ROM |
64 GB |
| RAM |
4 GB RAM |
| Chipset |
Mediatek MT6755 Helio P10 |
| GPU |
Mali-T860MP2 |
| CPU |
Octa-core (4×2.0 GHz Cortex-A53 & 4×1.0 GHz Cortex-A53) |
| Camera |
13 /16 MegaPixel |
| Battery |
Li-Po 2850 mAh battery (Non-removable) |
Preparation :
- Computer, Notebook or laptop using Window OS
- Download SP-flashtool ,this is utility tool for installation Android phone firmware base on Mediatek chips
- Download MEDIATEK USB Vcom driver
- Download MT6755_Android_scatter.txt, This is scatter file for applying Oppo R9 / Oppo F1 Plus X9009 Firmware partition
- Download Oppo R9-F1Plus-X9009-TWRP recovery.img, This is custom recovery TWRP v3.0.0.2 for Oppo R9 / Oppo F1 Plus X9009
- Download Oppo R9-F1Plus-X9009-STOCK recovery.img, This is Stock recovery from official ROM Oppo R9 / Oppo F1 Plus X9009
Note : Save all file to Computer
How To Flash TWRP Recovery On Oppo R9 / Oppo F1 Plus X9009
Via Fastboot Mode ( With PC )
- Rename Oppo R9-F1Plus-X9009-TWRP recovery.img to recovery.img
- type Command is fastboot flash recovery recovery.img
- Read more –> here
Via SP-Flashtool ( With PC ) *recommended
- Install Mediatek USB Vcom Driver on PC
- Unpack SP-Flashtool and Run Flashtool.exe
- at SP-Flashtool, Browse and choose MT6755_Android_scatter.txt
- Select part of recovery at SPFLashtool and select Oppo R9-F1Plus-X9009-TWRP recovery.img
- Turn off your Oppo R9 / Oppo F1 Plus X9009
- Start to Flashing TWRP Custom recovery
- done
How To Root TWRP Recovery On Oppo R9 / Oppo F1 Plus X9009
- TWRP recovery must be installed on your devices
- Save SuperSU.zip into SDcard –> Download SuperSU
- Turn off your Oppo R9 / Oppo F1 Plus X9009
- Press Volume Down+Power button to go into TWRP recovery mode
- Install SuperSU.zip
- Reboot system and done.
- Any guide for rooting here

Root Android devices
The rise of APK applications that require root access makes the android device users are very enthusiastic to have root access, It is also encouraged by Lack of satisfaction user to his devices. e.g: Improve CPU, Battery or User interface performance. For that we want to give a little knowledge especially to new users in doing root in accordance with security level.
1. Root android phones with PC (Safe)
This is a secure way to do root, because you can perform a full backup of data or system partitions before starting to modify your device. But custom recovery required installed on your device.
Read: how to install custom recovery like CWM, TWRP, Carliv or Philtouch.
- Download and save the Latest version of SuperSU.zip to device “Internal/External storage”
- Power off your Android devices, Press the button simultaneously “VOLUME UP + POWER button” to go into recovery mode
- install SuperSU.zip
- Reboot phone
- Done.
2. Root android devices without PC (Not safe)
This is one click rooted method but Why not safe? You can not restore to the first condition if your device Failed to root. Because you have not installed custom recovery. Unless, if you have the stock firmware file from your own backup that can be installed using flashtool or Stock recovery “adb sideload”. So this method is usually only done by the advanced user. But unfortunately many newbie do it.
- Using Kingroot APK/EXE
- Using Framaroot.apk
- using i-root APK/EXE
- etc.

TWRP 3.0.2-0 and Rooting Samsung Galaxy Note 7 SM-N930S
Warning : This guide just for Samsung Galaxy Note 7 with Model number SM-N930S, Modifying the system will eliminate the manufacturer’s warranty, are also at risk on a mobile phone such as hard / Softbrick, so please follow the instructions carefully in order to reduce the risk.
Preparation :
- Window PC
- USB Cable.
- Download Official twrp-3.0.2-0-graceltekor.img.tar (MD5) Samsung Galaxy Note 7 SM-N930S for to PC
- Download Samsung USB Driver.zip and install on PC
- Download Odin3 Latest version
- Download Developer-Options.apk and install to your Galaxy Note 7, This app for easy access to developer options settings.
- Download SuperSU.zip
INSTALLING TWRP 3.0.2-0 SAMSUNG GALAXY NOTE 7 SM-N930S :
- at phone, open Developer-Options.apk , then tick USB Debugging and OEM Unlock is enable
- Next, check the “Auto Reboot” and “F. Reset Time” options in Odin3 Tool. and browse on [AP] = twrp-3.0.2-0-gracelte.img.tar and Press START to flashing TWRP.

- If Samsung USB Driver already install right on your computer then Odin3 will recognize your device as another COM Port.
- Run Odin3.exe, and leave it open on your desktop.
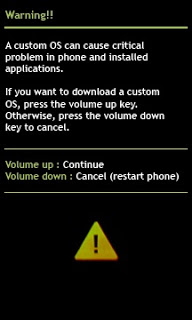
- Now Reboot your device, and press hold Volume Down + Home button. until you can see Warning Sign. see simulations below….On Download Mode windows press Volume Up and then connect your device to computer using USB Cable.

- Install Samsung USB Driver on your computer and make sure it completely work.
- PRESS Hold [Volume Down] + [Home] + [Power] to get out of Download mode and Press Volume Up when the screen blanks.
- TWRP 3.0.2-0 Has been installed on your Galaxy Note 7.
ROOTING SAMSUNG GALAXY NOTE 7 SM-N930S
- Go into TWRP recovery mode
- Install SuperSU.zip
- Reboot and enjoy it.

TWRP FEATURES
MTP support
USB Mass Storage support
Micro SDcard and USB OTG storage support
f2fs file system support (read, write, format, backup & restore)
exFAT file system support (read, write, format, backup & restore)
NTFS file system support (read, write, format)
ADB root
Full SELinux support
Built in android 6.0 tree
Source Code:
https://github.com/TeamWin/android_d…msung_gracelte
Credites :
jcadduono, XDA, Team Win.
Regards, Boycracked 🙂
TWRP 3.0.2-0 and Rooting Samsung Galaxy Note 7 SM-N930L
Warning : This guide just for Samsung Galaxy Note 7 with Model number SM-N930L, Modifying the system will eliminate the manufacturer’s warranty, are also at risk on a mobile phone such as hard / Softbrick, so please follow the instructions carefully in order to reduce the risk.
Preparation :
- Window PC
- USB Cable.
- Download Official twrp-3.0.2-0-graceltekor.img.tar (MD5) Samsung Galaxy Note 7 SM-N930L for to PC
- Download Samsung USB Driver.zip and install on PC
- Download Odin3 Latest version
- Download Developer-Options.apk and install to your Galaxy Note 7, This app for easy access to developer options settings.
- Download SuperSU.zip
INSTALLING TWRP 3.0.2-0 SAMSUNG GALAXY NOTE 7 SM-N930L :
- at phone, open Developer-Options.apk , then tick USB Debugging and OEM Unlock is enable
- Next, check the “Auto Reboot” and “F. Reset Time” options in Odin3 Tool. and browse on [AP] = twrp-3.0.2-0-gracelte.img.tar and Press START to flashing TWRP.
- If Samsung USB Driver already install right on your computer then Odin3 will recognize your device as another COM Port.
- Run Odin3.exe, and leave it open on your desktop.
- Now Reboot your device, and press hold Volume Down + Home button. until you can see Warning Sign. see simulations below….On Download Mode windows press Volume Up and then connect your device to computer using USB Cable.
- Install Samsung USB Driver on your computer and make sure it completely work.
- PRESS Hold [Volume Down] + [Home] + [Power] to get out of Download mode and Press Volume Up when the screen blanks.
- TWRP 3.0.2-0 Has been installed on your Galaxy Note 7.
ROOTING SAMSUNG GALAXY NOTE 7 SM-N930L
- Go into TWRP recovery mode
- Install SuperSU.zip
- Reboot and enjoy it.
TWRP FEATURES
MTP support
USB Mass Storage support
Micro SDcard and USB OTG storage support
f2fs file system support (read, write, format, backup & restore)
exFAT file system support (read, write, format, backup & restore)
NTFS file system support (read, write, format)
ADB root
Full SELinux support
Built in android 6.0 tree
Source Code:
https://github.com/TeamWin/android_d…msung_gracelte
Credites :
jcadduono, XDA, Team Win.
Regards, Boycracked 🙂
TWRP 3.0.2-0 and Rooting Samsung Galaxy Note 7 SM-N930K
Warning : This guide just for Samsung Galaxy Note 7 with Model number SM-N930K, Modifying the system will eliminate the manufacturer’s warranty, are also at risk on a mobile phone such as hard / Softbrick, so please follow the instructions carefully in order to reduce the risk.
Preparation :
- Window PC
- USB Cable.
- Download Official twrp-3.0.2-0-graceltekor.img.tar (MD5) Samsung Galaxy Note 7 SM-N930K for to PC
- Download Samsung USB Driver.zip and install on PC
- Download Odin3 Latest version
- Download Developer-Options.apk and install to your Galaxy Note 7, This app for easy access to developer options settings.
- Download SuperSU.zip
INSTALLING TWRP 3.0.2-0 SAMSUNG GALAXY NOTE 7 SM-N930K :
- at phone, open Developer-Options.apk , then tick USB Debugging and OEM Unlock is enable
- Next, check the “Auto Reboot” and “F. Reset Time” options in Odin3 Tool. and browse on [AP] = twrp-3.0.2-0-gracelte.img.tar and Press START to flashing TWRP.
- If Samsung USB Driver already install right on your computer then Odin3 will recognize your device as another COM Port.
- Run Odin3.exe, and leave it open on your desktop.
- Now Reboot your device, and press hold Volume Down + Home button. until you can see Warning Sign. see simulations below….On Download Mode windows press Volume Up and then connect your device to computer using USB Cable.
- Install Samsung USB Driver on your computer and make sure it completely work.
- PRESS Hold [Volume Down] + [Home] + [Power] to get out of Download mode and Press Volume Up when the screen blanks.
- TWRP 3.0.2-0 Has been installed on your Galaxy Note 7.
ROOTING SAMSUNG GALAXY NOTE 7 SM-N930K
- Go into TWRP recovery mode
- Install SuperSU.zip
- Reboot and enjoy it.
TWRP FEATURES
MTP support
USB Mass Storage support
Micro SDcard and USB OTG storage support
f2fs file system support (read, write, format, backup & restore)
exFAT file system support (read, write, format, backup & restore)
NTFS file system support (read, write, format)
ADB root
Full SELinux support
Built in android 6.0 tree
Source Code:
https://github.com/TeamWin/android_d…msung_gracelte
Credites :
jcadduono, XDA, Team Win.
Regards, Boycracked 🙂
TWRP 3.0.2-0 and Rooting Samsung Galaxy Note 7 SM-N930FD
Warning : This guide just for Samsung Galaxy Note 7 with Model number SM-N930FD, Modifying the system will eliminate the manufacturer’s warranty, are also at risk on a mobile phone such as hard / Softbrick, so please follow the instructions carefully in order to reduce the risk.
Preparation :
- Window PC
- USB Cable.
- Download Official twrp-3.0.2-0-gracelte.img.tar Samsung Galaxy Note 7 SM-N930FD for to PC
- Download Samsung USB Driver.zip and install on PC
- Download Odin3 Latest version
- Download Developer-Options.apk and install to your Galaxy Note 7, This app for easy access to developer options settings.
- Download SuperSU.zip
INSTALLING TWRP 3.0.2-0 SAMSUNG GALAXY NOTE 7 SM-N930FD :
- at phone, open Developer-Options.apk , then tick USB Debugging and OEM Unlock is enable
- Next, check the “Auto Reboot” and “F. Reset Time” options in Odin3 Tool. and browse on [AP] = twrp-3.0.2-0-gracelte.img.tar and Press START to flashing TWRP.
- If Samsung USB Driver already install right on your computer then Odin3 will recognize your device as another COM Port.
- Run Odin3.exe, and leave it open on your desktop.
- Now Reboot your device, and press hold Volume Down + Home button. until you can see Warning Sign. see simulations below….On Download Mode windows press Volume Up and then connect your device to computer using USB Cable.
- Install Samsung USB Driver on your computer and make sure it completely work.
- PRESS Hold [Volume Down] + [Home] + [Power] to get out of Download mode and Press Volume Up when the screen blanks.
- TWRP 3.0.2-0 Has been installed on your Galaxy Note 7.
ROOTING SAMSUNG GALAXY NOTE 7 SM-N930FD
- Go into TWRP recovery mode
- Install SuperSU.zip
- Reboot and enjoy it.
TWRP FEATURES
MTP support
USB Mass Storage support
Micro SDcard and USB OTG storage support
f2fs file system support (read, write, format, backup & restore)
exFAT file system support (read, write, format, backup & restore)
NTFS file system support (read, write, format)
ADB root
Full SELinux support
Built in android 6.0 tree
Source Code:
https://github.com/TeamWin/android_d…msung_gracelte
Credites :
jcadduono, XDA, Team Win.
Regards, Boycracked 🙂
TWRP 3.0.2-0 and Rooting Samsung Galaxy Note 7 SM-N930F
Warning : This guide just for Samsung Galaxy Note 7 with Model number SM-n930F, Modifying the system will eliminate the manufacturer’s warranty, are also at risk on a mobile phone such as hard / Softbrick, so please follow the instructions carefully in order to reduce the risk.
Preparation :
- Window PC
- USB Cable.
- Download Official twrp-3.0.2-0-gracelte.img.tar Samsung Galaxy Note 7 SM-N930F for to PC
- Download Samsung USB Driver.zip and install on PC
- Download Odin3 Latest version
- Download Developer-Options.apk and install to your Galaxy Note 7, This app for easy access to developer options settings.
- Download SuperSU.zip
INSTALLING TWRP 3.0.2-0 SAMSUNG GALAXY NOTE 7 SM-n930F :
- at phone, open Developer-Options.apk , then tick USB Debugging and OEM Unlock is enable
- Next, check the “Auto Reboot” and “F. Reset Time” options in Odin3 Tool. and browse on [AP] = twrp-3.0.2-0-gracelte.img.tar and Press START to flashing TWRP.
- If Samsung USB Driver already install right on your computer then Odin3 will recognize your device as another COM Port.
- Run Odin3.exe, and leave it open on your desktop.
- Now Reboot your device, and press hold Volume Down + Home button. until you can see Warning Sign. see simulations below….On Download Mode windows press Volume Up and then connect your device to computer using USB Cable.
- Install Samsung USB Driver on your computer and make sure it completely work.
- PRESS Hold [Volume Down] + [Home] + [Power] to get out of Download mode and Press Volume Up when the screen blanks.
- TWRP 3.0.2-0 Has been installed on your Galaxy Note 7.
ROOTING SAMSUNG GALAXY NOTE 7 SM-n930F
- Go into TWRP recovery mode
- Install SuperSU.zip
- Reboot and enjoy it.
TWRP FEATURES
MTP support
USB Mass Storage support
Micro SDcard and USB OTG storage support
f2fs file system support (read, write, format, backup & restore)
exFAT file system support (read, write, format, backup & restore)
NTFS file system support (read, write, format)
ADB root
Full SELinux support
Built in android 6.0 tree
Source Code:
https://github.com/TeamWin/android_d…msung_gracelte
Credites :
jcadduono, XDA, Team Win.
Regards, Boycracked 🙂

Rooting LG Spirit LG-H422
We need TWRP recovery for Rooting LG-H422, So as not to crack Uboot out, we tried but without success. Found a way through xcore_rj for which he thanks a lot.
- Download and save to Phone sdcard SuperSU.zip –> Download here
- Download and extract Root(6.0).rar on PC –> Download here
- Download and extract SP_Flash_Tool_by_djperya.rar on PC–> Download here
- Run Flashtools and than install all files in Root(6.0).rar (Boot.img, Uboot.img, recovery.img, Logo.bin)
- Go into recovery mode and install SuperSU.zip
- Done.
Related post :
- Need repair or Back to 100% LG Spirit LG-H422 Stock rom –> Here
- Need custom rom for LG Spirit LG-H422 –> Here
- Need TWRP 3.0 or PhilzRecovery for LG Spirit LG-H422 –> Here
If you have question, leave comment. thanks and enjoy it 🙂

Disclaimer :
This guides for Samsung Galaxy J5 2016 (SM-J510H) user and for educational purpose only, Boycracked not responsible if your device bricked after following this tutorial. ( Do With Your Own Risk )
Download files needed :
Installing TWRP Recovery v3.0.2 on Samsung Galaxy J5 2016 (SM-J510H)
- Download all required files to your computer, then enable the USB Debugging on your device ↦ go to Settings ↦ Developer Options ↦ enable the USB Debugging options, and Settings -> Developer Options -> Enable OEM unlocking ( If you cannot see the Developer Options then go to About Phone and then tap 7x on Settings/About Phone/Build Number) or you can auto go into develover option using Depelover-Options.apk –> Download here
- Install Samsung USB Driver on your computer and make sure it completely work.
- Save SuperSU_PRO_v2.74.zip into SDcard phone
- Extract, install and Run Odin3_v3.10.7.exe on PC
- Now turn off your device, after completely turn off press and hold Volume Down + Home + Power button until you can see Warning Sign

- at Download Mode, press Volume Up then connect your device to computer using USB Cable
- If Samsung USB Driver already install fine on your computer then Odin3 will recognize your device as another COM Port.
- Now press the PDA/AP button, select TWRP_3.0.2_SM_J510H.tar and then press Start button below, process usually take 20-30 seconds to finish and will be mark with GREEN PASS message on the odin

- Done, now you can disconnect your device.
Rooting Samsung Galaxy J5 2016 (SM-J510H)
- re-turn off your device, go into TWRP recovery mode ( PRESS Operates simultaneously Volume Up + Home + Power button)
- on TWRP recovery, select Install zip, and then install SuperSU_PRO_v2.74.zip ( NO WIPE )
- Reboot now, Enjoy it

to confirm that your already successful rooted install root checker from Google Play Store.
Congratulations, You already success Root and installing TWRP 3.0.2 Samsung Galaxy J5 2016 (SM-J510H) using Odin methods, please leave comments if you found problems or any broken links. Thank You
Regards,
BoyCracked

")
")
")

You must be logged in to post a comment.